Overview
This chapter will guide you through the process of setting up your system to create and attach .PDF formatted statements and invoices to emails that can be sent directly from within Route Manager.
Note: This setup will also resolve the issues with blank email PDF attachments.
Installing Ghostscript Software
- First, locate the proper “32Bit” or “64Bit” version for the Operating System.
- Note: Most operating systems from Windows XP and newer run on a 64bit.
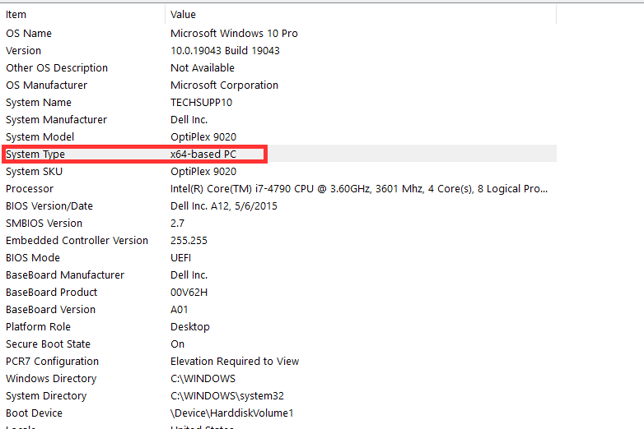
- You can find this by going to the start button on the desktop.
- Type in System Information
- Locate the System Type section.
- The number noted will let you know if it's a 32 or 64 bit system.
- Once the bit is confirmed, download the proper .exe file listed below onto the system:
- Windows 32bit Operating System: GhostScript_gs920w32.exe
- Windows 64bit Operating System: GhostScript_gs920w64.exe
- Follow the installation process and make sure the Install Path is pointing to the local drives root folder.
- Example: C:\PROGRAM FILES (X86)\GS\GS9.20\BIN\GSWIN32.EXE
Installing Postscript Printer
- Click on the start button and type in Devices and Printers (or Printers and Scanners).
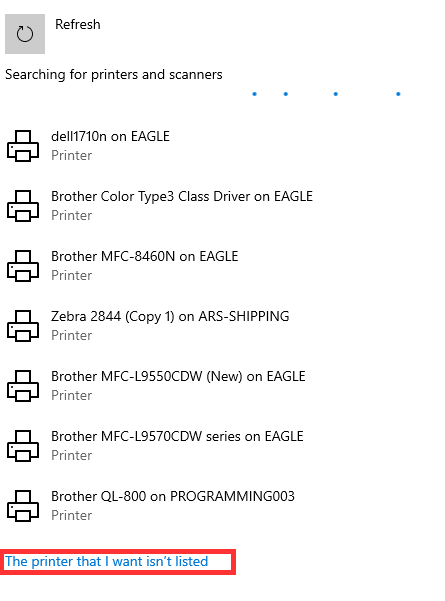
- Click the "Add a printer or scanner button" to search for local printers.
- After a few seconds, the system will pop up a new option.
- You will then want to select "The printer that I want isn't listed".
- In the following window, click the "Add a local printer or network printer with manual settings".

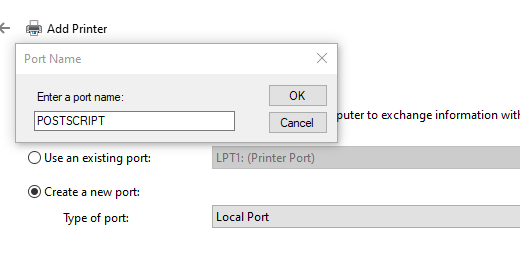
- Select Create a new port and choose: Local Port.
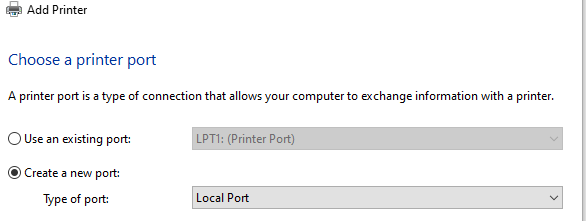
- A window will then populate for you to name the port.
- The port should be: POSTSCRIPT
- Next, you will need to Select a printer type and Driver.
- It does not matter which Manufacture you select but the Printer Driver should always have a PS in it.
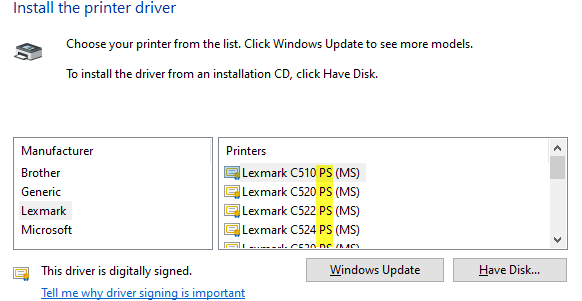
- You can use any one of the Drivers listed under the Printers section.
Commonly used drivers:- Windows 2000, XP: “Apple” and then “Apple Color LaserWriter 12/600”
- Windows Vista/7/Server 2008: “Lexmark" C510 PS (MS)
- Windows 8/10/11/Server 2012/Server 2016/Sever 2019: “Samsung” then “Samsung B/W Laser PS Class Driver” (If this is not available, use the "Lexmark C510 PS (MS)".)
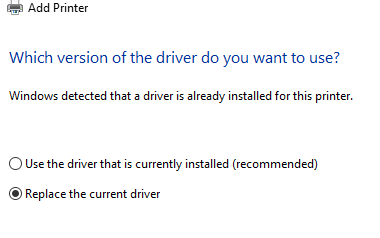
- If a Driver was already installed for the postscript printer, a pop up window may appear.
- Select "Replace the current driver" option.
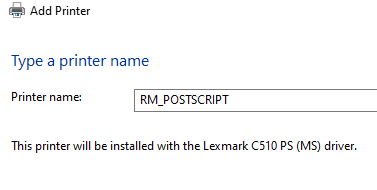
- The system will then ask for a printer name.
- This should always be: RM_POSTSCRIPT
- Select Next and the printer will install.
- Once Complete you will need to do the following steps below to assign the printer to RMA.
Update Local Settings
In order for Route Manager to properly convert invoices and payments to the .PDF option, you will need to define the Postscript Printer and Ghostscript settings within Local Settings on each workstation.
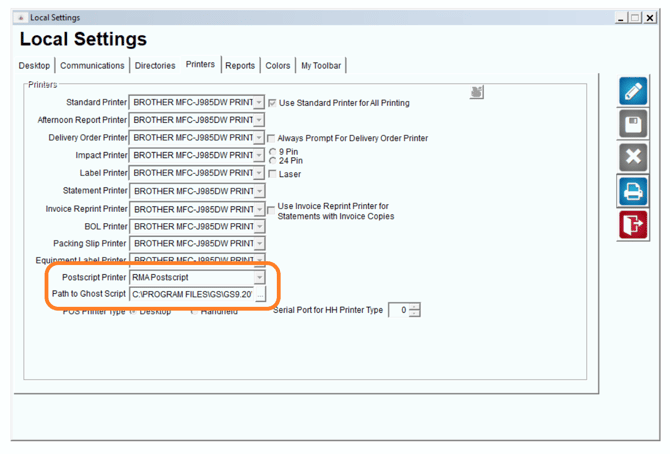
- Navigate to File > Local Settings, and select the Printers tab. Click Modify, and select the Postscript Printer configured earlier from within the Postscript Printer field.
- NOTE: The Postscript printer should only be assigned to the Postscript printer field and no other printer fields.
- Next, select the Browse button beside the ‘Path to Ghost Script’ option:
- Double-click on the ‘gs’ (Ghostscript) folder in the Program Files directory of your PC, or within the installation directory on the network.
- Double-click on the ‘gsX.XX’ folder (depending on the version installed, the numbers displayed will vary).
- Double-click on the ‘bin’ folder.
- Double-click on the ‘gswin64c.exe’ file.
- The path to Ghostscript will now be displayed within Local Settings. Click Save to complete the process.
- Repeat all of the steps above on each ecmployees workstation.
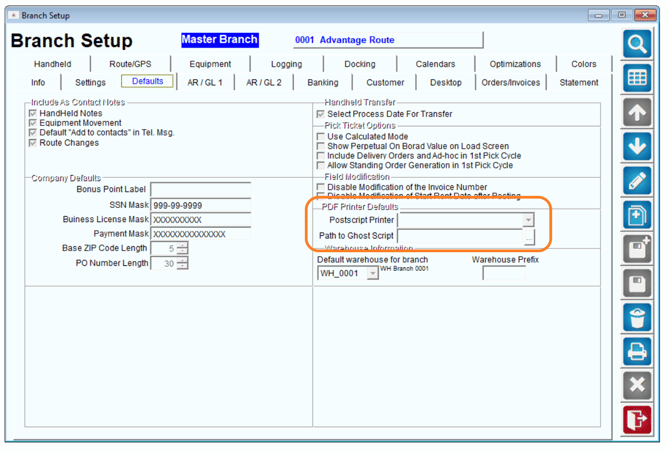
Update Branch Setup
Navigate to File > Branch Setup > Defaults tab, and select defaults for Postscript and Ghostscript.
These defaults should be set to the post and ghost script you setup earlier in this section.
Do note that these MUST be available to all users. If you are running Route Manager on a mapped drive, this will not work.