Managing the Signature Pad Timeout on your Mango Desktop Utility is key to keeping things running smoothly. With the right settings, you can avoid unnecessary delays and make sure your customers have a hassle-free experience when signing documents. This guide will walk you through the simple steps to tweak the timeout settings, so your system stays quick and responsive.
Process
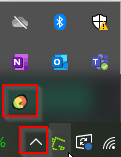
1. Access the Notification Chevron
Click on the "Notification Chevron" located on your desktop taskbar. This will open a drop-down menu where you can access various settings and notifications.
2. Open the Mango Desktop Utility
Right-click on the Mango Desktop Utility icon from your desktop or taskbar. Then, select "Open."
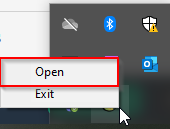
This action will launch the MangoFile Desktop Utility.

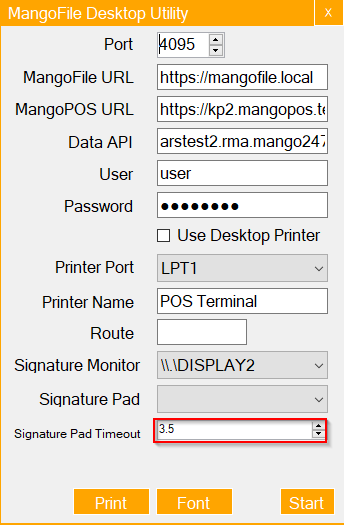
3. Configure the Signature Pad Timeout
In the MangoFile Desktop Utility, locate the Signature Pad Timeout setting. Use the up and down arrows to adjust the timeout duration according to your preference. This setting determines how long the utility will wait before a signature pad becomes inactive.
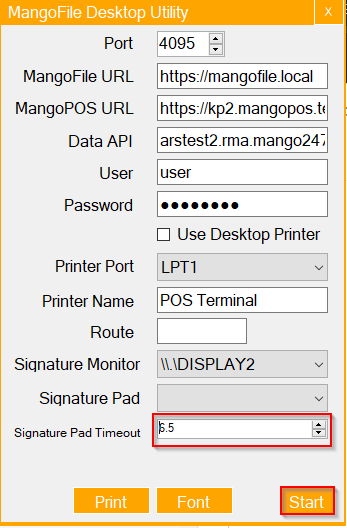
4. Enable the New Configuration
Once you have set the desired timeout duration, click on "Start" to activate the new configuration. The utility will apply the changes, ensuring your signature pad remains active for the specified amount of time.
Summary
In this article, you learned how to adjust the Signature Pad Timeout settings on the Mango Desktop Utility. By following these steps, you ensure that your signature capture system is optimized for efficient and effective use, reducing downtime and improving overall workflow performance.