Introduction
One of the key features in RMA is the ability to track container (i.e. bottles) deposits. This means that you can track your bottles (glass or plastic) to maximize efficiency and minimize loss.
There are several things that you will need to do to configure product information for deposit and empty bottle tracking. There are also videos that can help with the process, as well. Finally, our support team can assist you if you get stuck.
Deposit Types
For container deposits, every product that requires a deposit — or needs to be tracked at no charge — is associated with a deposit code. In this regard, there is a one-to-one relationship between products and deposits.
The Deposit Types option has been added to allow you to establish the one-to-one relationship between the product and the deposit.
For example, the ‘Deposit Type 1’ item added below will be assigned to the following items:
- 5 Gallon Spring
- 5 Gallon Deposit
A Deposit Type will need to be added for each item that will require a deposit when sold. In the sample company used in this document, two Deposit Types are added:
- Deposit Type 1: assigned to all 5 Gallon products
- Deposit Type 3: assigned to all 3 Gallon products.
Navigate to Lists > Products Codes > Deposit Types and add a unique Deposit Type for each deposit required.
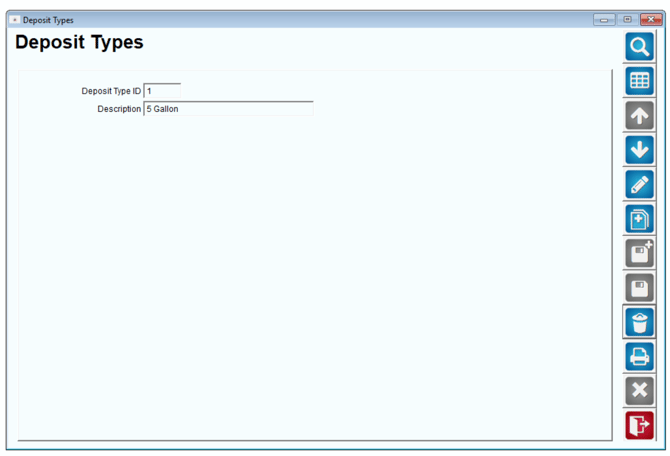
NOTE: Up to five characters can be used in the ‘Deposit Type ID’ field.
Product Class Codes
The Product Class Codes are used primarily for categorizing sales data in Route Manager. The system also uses preset classes to perform internal functions, such as returning empty containers to stock.
Add Product Class ‘*’ with the description ‘Empty Containers’ under Lists > Product Codes >Product Class Codes:
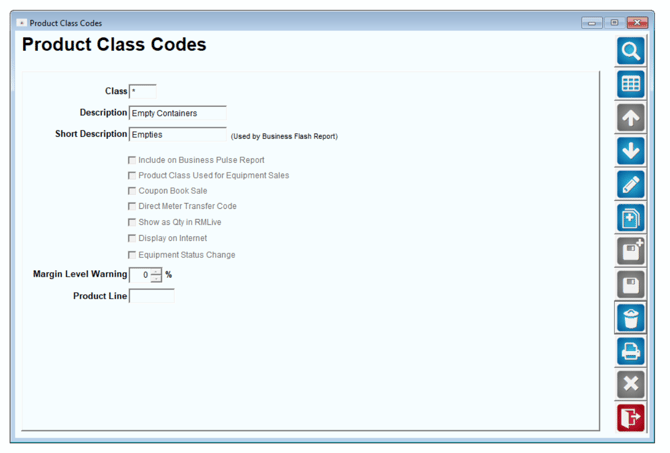
NOTE: Skip to the next section if the class code already exists.
Product Charge Codes
Now that you have established the required Deposit Types and Product Class Codes, you will need to assign them to the proper items within the product Charge Codes screen.
Navigate to Lists > Product Codes > Product Charge Codes and configure your items using the guidelines below.
The following item is assigned to Product Class ‘0’ (5 Gallon W/ Deposit) on the Accounting tab. This code represents a 5 gallon bottle of water sold by the company.
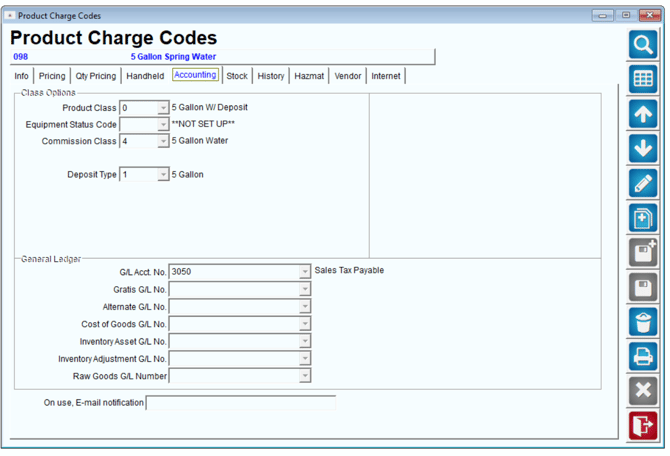
The 5 gallon item will be assigned to the ‘Deposit Type 1’ option on the same tab:
Next, a deposit item is created for tracking and charging deposits when the item above is sold.
The item is assigned to Product Class ‘7’ — created for deposit items (recommended) — and ‘Deposit Type 1’ to ensure the deposit is associated with the ‘5 Gallon’ item above.
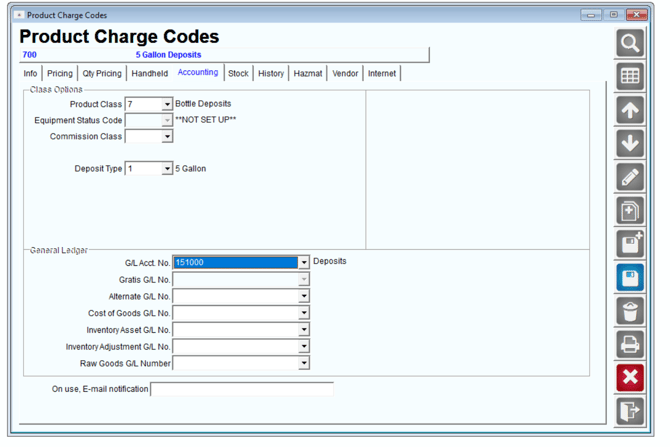
NOTE: Establish the default deposit price on the Pricing tab for this item. Leave the price at 0.00 if the customer will not be charged for deposits — ideal for container tracking.
Repeat these steps for each deposit code needed. The water company used in this example is set up as follows:
- 5 Gallon Spring (Class W, Type 1) and 5 Gallon Deposit (Class 7, Type 1)
- 5 Gallon Distilled (Class W, Type 1) and 5 Gallon Deposit (Class 7, Type 1)
- 3 Gallon Water (Class W, Type 2) and 3 Gallon Deposit (Class 7, Type 2)
- 3 Gallon Distilled (Class W, Type 2) and 3 Gallon Deposit (Class 7, Type 2)
After you have configured your deposit items, continue to the next section.
Setting up Branch for Desktop Deposits
You may want flexibility to see deposits on the desktop as you enter invoices or modify them.
This feature can be enabled by selecting ‘Use Quick Return Entry’ under File > Branch Setup, on the Orders/ Invoices tab.
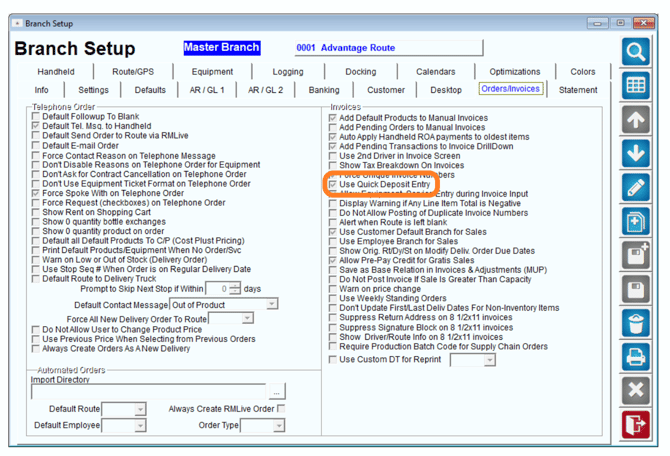
After the option has been enabled, a ‘Returns’ button will be available on the bottom of the Invoices and Adjustments screen.
Showing Deposits on Customer Receipt
As you print (or email) a receipt to the customer, it is standard to show the container deposits as you print the invoice - if there is a difference in the number of bottles delivered and the number returned. It will show both the IN and the Picked up amounts.
You can make this (show bottles delivered and picked up) happen for every transaction. To do this, go to Lists > Routes > Handheld Class and go to the receipt tab. Note the option highlighted by the red arrow, below.
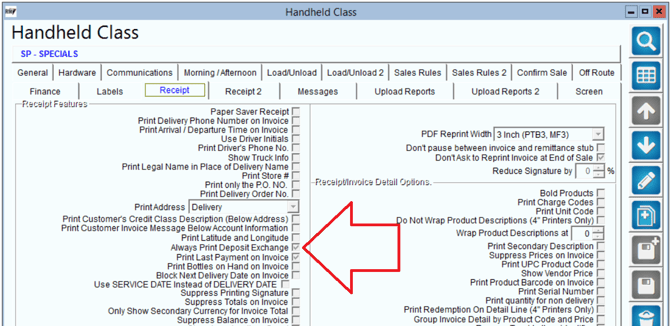
If you deselect this box, then the bottles only show when the amount delivered is different than the amount picked up.
Assigning deposits to customers
Each deposit code configured will be available within the Deposits section of Customer Information, on the Products tab.
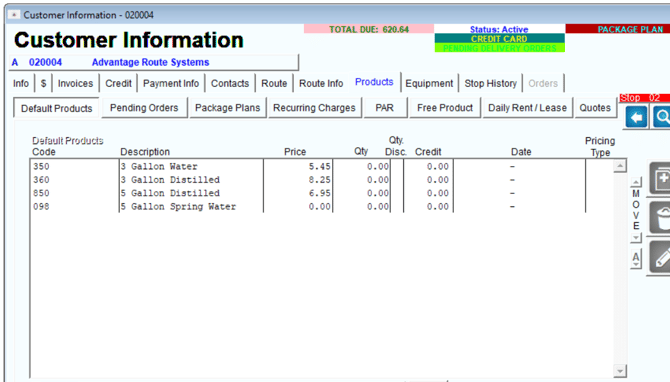
Assign each deposit code to the customer’s account by selecting Modify and choosing the item from the drop-down list.
NOTE: Only deposit codes will appear in the drop-down list.
The price that appears next to each deposit code will reflect the default price assigned to the customer (based on their Price Level). Optionally, you can override the price of the deposit per customer by adding the deposit code to the customer’s Default Product list, as shown below:
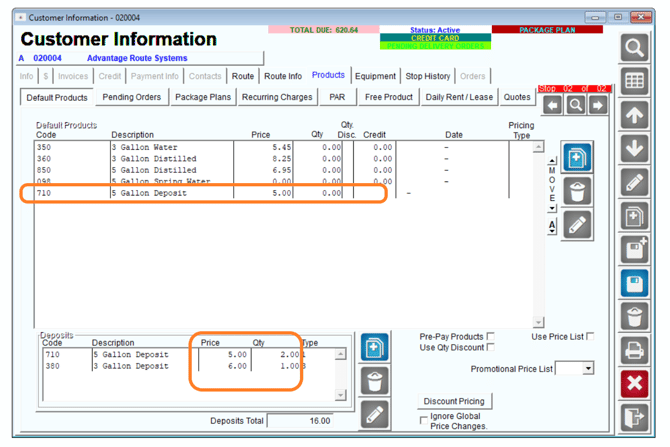
Code ‘710’ has been added to their list at ‘5.00,’ creating a unique price on this account.
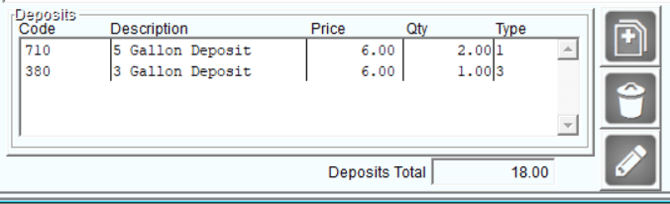
Additionally, the ‘Qty’ field reflects the number of deposits paid by the customer, as well as their containers on hand. The Deposits Total field on the right side of the screen will reflect the total amount in deposits charged to the customer, for example:

Deposit tracking on the Desktop
This section provides you with examples used to teach you how to properly enter container deposits on desktop invoices.
The customer below purchased five of the ‘5 Gallon Spring’ water bottles, and since the water bottles are deposit type items, the customer should also be billed for five deposits using the ‘5 Gallon Deposit’ code (below):
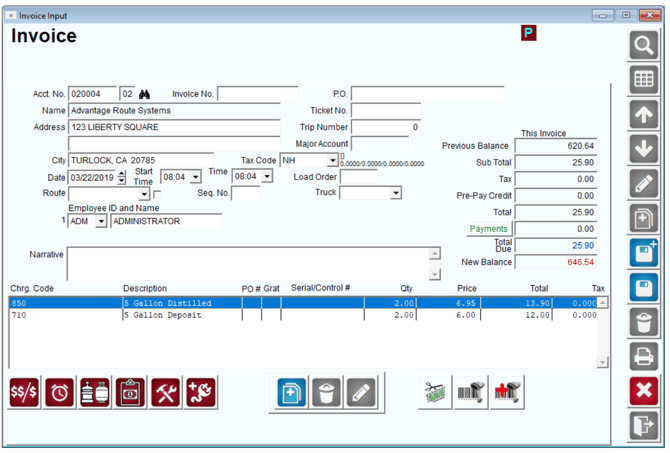
NOTE: The example above assumes the customer has never paid a container deposit on previous invoices.
The customer is billed for five full bottles, and is charged five deposits for the containers. The next example illustrates the proper entry if the customer returns empty containers during the transaction.
If the customer is returning any empty containers, or has previously paid for container deposits, then the invoice entry will be affected.
For example, the account below reflects that the customer has three empty containers on hand, and has paid 18.00 dollars in deposits:
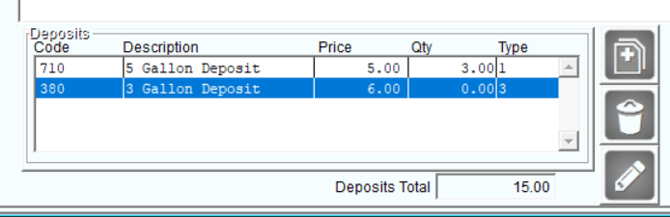
If the customer purchases five bottles and returns three empty containers, the account will only need to be billed for two additional deposits since they have already been billed for three previously:

Alternatively, an option has been created that will automatically add the correct deposit entry on each invoice (without having to check first).
This feature can be enabled by selecting ‘Use Quick Return Entry’ under File > Branch Setup, on the Orders/ Invoices tab.
After the option has been enabled, a ‘Returns’ button will be available on the bottom of the Invoices and Adjustments screen.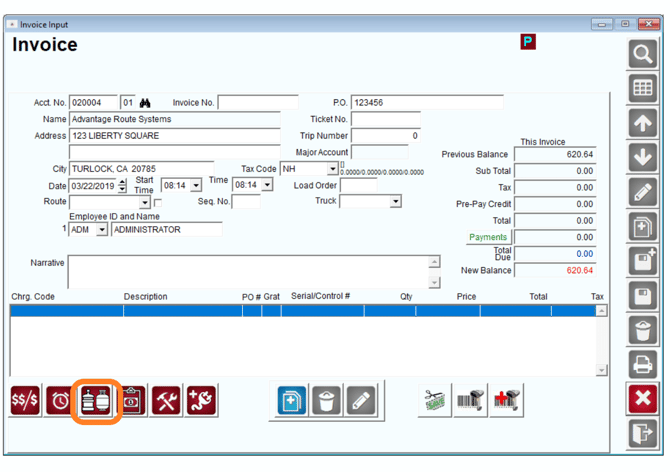
When a customer makes a deposit item purchase, add the full containers being purchased to the invoice, and click the Returns button to add the deposit entry to the invoice.
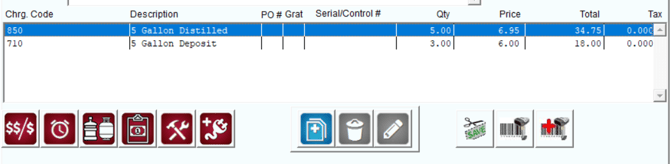
For example, this customer is purchasing five of the ‘5 Gallon Distilled’ water bottles:

Instead of adding the bottle deposit code manually, choose the Returns button on the bottom of the invoice screen:
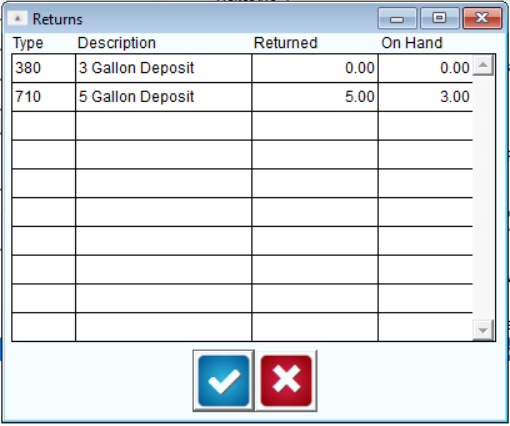
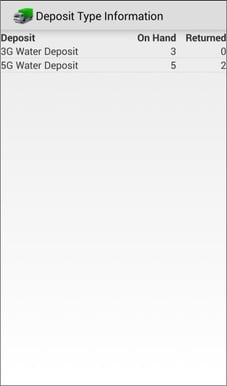
The Returns screen reflects that the customer already has three of the ‘5 Gallon Deposits’ on hand.
Within the ‘Returned’ field, enter the number of containers that the customer is returning during the transaction (the customer is returning three below):
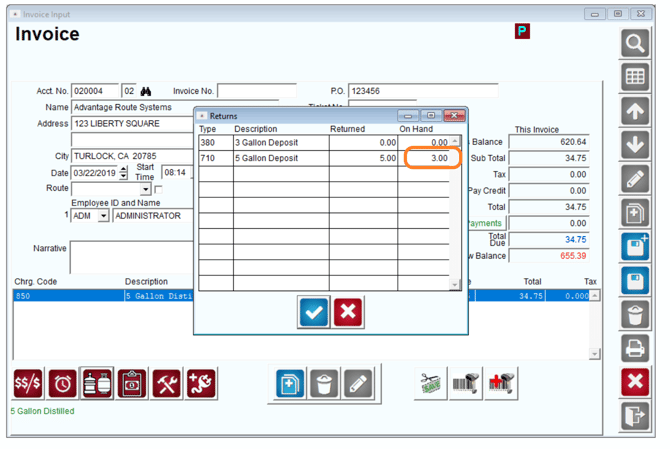
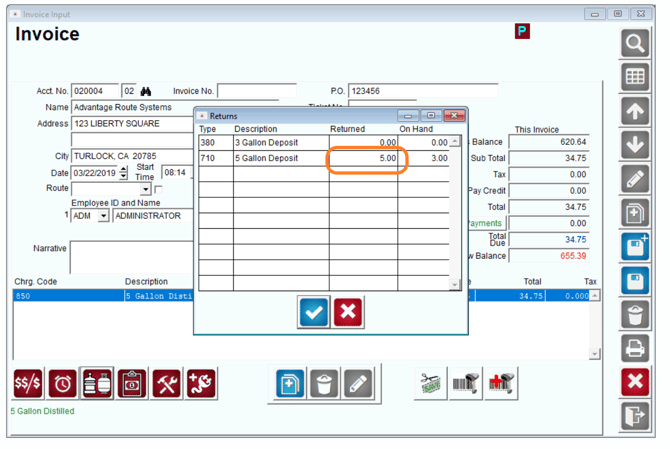
After you have entered the number of containers being returned, click OK. The system will update the invoice to reflect the proper deposit entry:
Deposit tracking on the handheld
Charging deposits and tracking containers on the handheld is a simple routine. When the driver sells a deposit type item to a customer, the system will automatically determine if a deposit should be charged on the account.
For example, the screen below shows that the customer purchased five full bottles and already has 3 bottles on hand for the item:
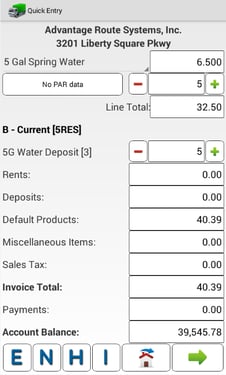
The driver enters an adjustment for the number of containers being returned on the invoice:

The system will bill the customer for three additional deposits automatically (this customer is billed 6.00 per deposit):
Additional Options
![]()
|
The system will automatically display the correct ‘Label’ associated with the corresponding deposit item selected:
.png?width=228&height=386&name=1553260837898%20(1).png)
Additionally, the driver can tap directly on the deposit label to scroll through all of the deposit labels available, or, tap-and-hold on the label to view all of the labels on a single screen:
Empty Container Setup
When each driver returns to the warehouse at the end of the day, they may be required to unload the empty containers they have on their delivery vehicle — this is helpful for managing empty container inventory on a daily basis.
Prior to being able to manage the empty containers properly, you will need to create a corresponding ‘Empty Container’ code for each deposit container Type in the system.
For example, if your company uses four deposit container Types, then four empty container codes will need to be created.
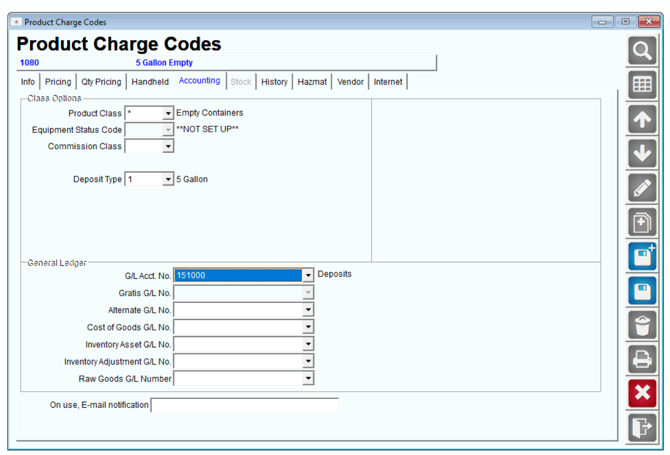
Create each empty container code under Lists > Product Codes > Product Charge Codes.
Follow the requirements below for creating each empty container code:
- Do not enter a price on the item.
- Assign the empty code to Product Class ‘*’ Empty Containers (created at the beginning of this chapter) on the Accounting tab.
- Select the corresponding ‘Deposit Type’ that applies to the related container.
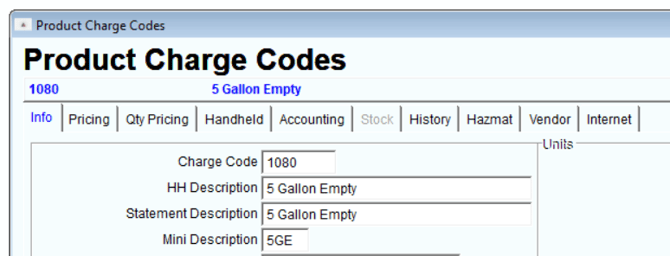
Here is an example of a completed ‘5 Gallon Empty’ code:
Repeat this process for each empty container code needed.
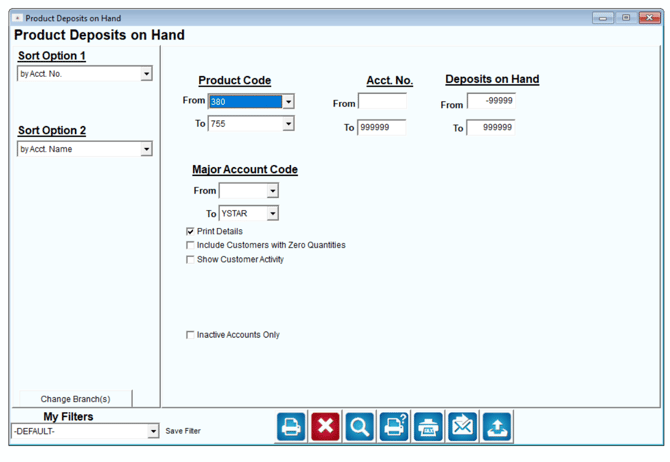
Product Deposits on Hand Report
The Product Deposits on Hand Report shows the total number of bottles (containers) at each customer’s location. The Product Deposits on Hand report can be found under Reports>Accounting Reports>Other>Product Deposits on Hand.
Commissions on Deposits
This will walk you through the process of creating commissions for the empty containers the driver collects while on route.
See Article: Driver Commissions
Deposits on Mango Web
You can also set up the RMA system to automatically charge new customers for bottle deposits on their first order as they sign up for a new account.
Instructions for this are available in the Mango Web manual.