In today's fast-paced field operations, having the flexibility to manage orders and invoices directly from handheld devices is crucial. Imagine being on the road, making deliveries, and needing to adjust an invoice or order on the fly—perhaps due to a customer request or an unexpected change in product availability. This article will walk you through the steps to enable and use the "Allow Editing of Orders and Invoices" feature on the Mango One Mobile (MOM) handheld device.
This article provides a detailed, step-by-step process for setting up the handheld devices in the Route Manager Advanced (RMA) and outlines the procedures your team will follow on the handheld during day-to-day operations. Whether you're setting up a new route, making a quick edit to an invoice, or reprinting an updated receipt, this guide has you covered.
Note: You must be on RMA Version 8.2 or later.
Below, you’ll find a Table of Contents to help you navigate through the steps and instructions.
Setup
As you setup this feature, it is assumed that you have a fully functional RMA System.
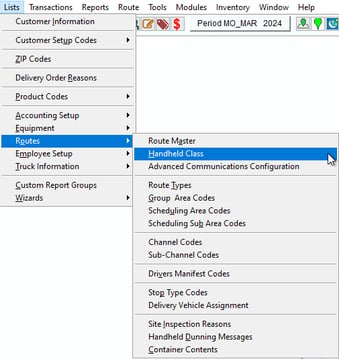
To begin, navigate to Lists > Routes > Handheld Class in RMA.
In the Handheld Class screen, select the Mango One Mobile tab. Click the Modify button and check the option "Allow Editing of Orders and Invoices" from the list of available settings.
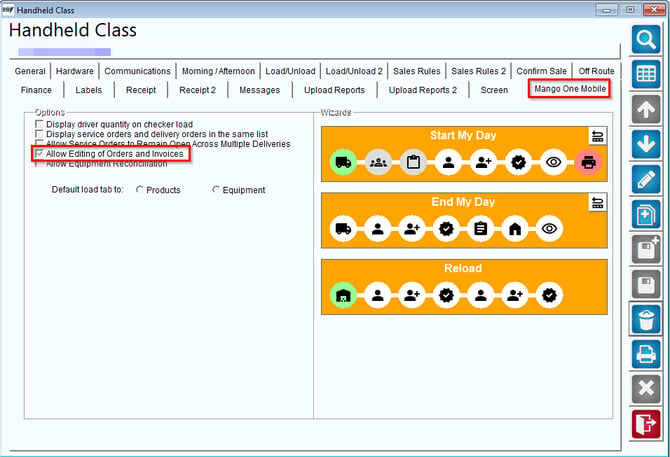
Finally, click Save to apply the changes.
Process on Mango One Mobile
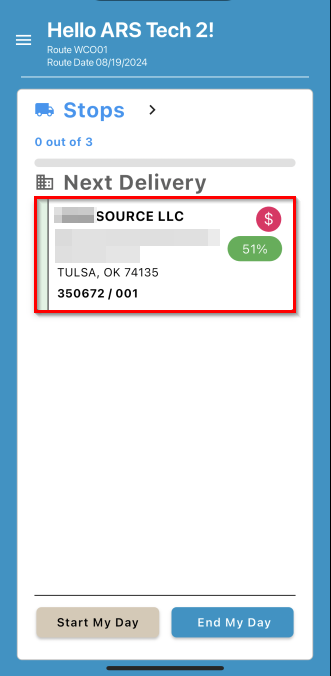
On your handheld device, operate as usual by selecting the appropriate Stop on the main screen.
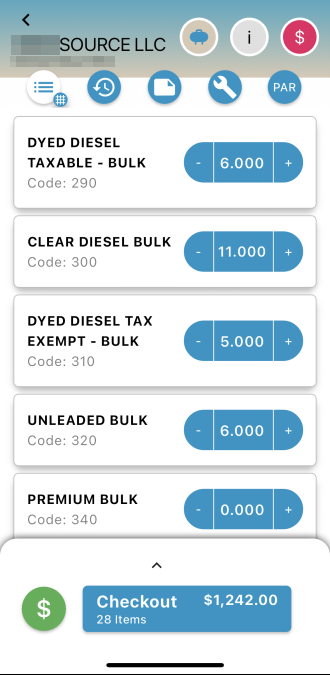
After choosing a stop, input the quantities for the products as needed. Once you’ve completed this step, proceed by selecting Checkout.
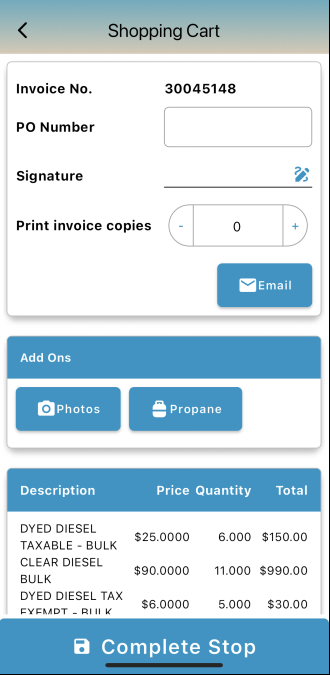
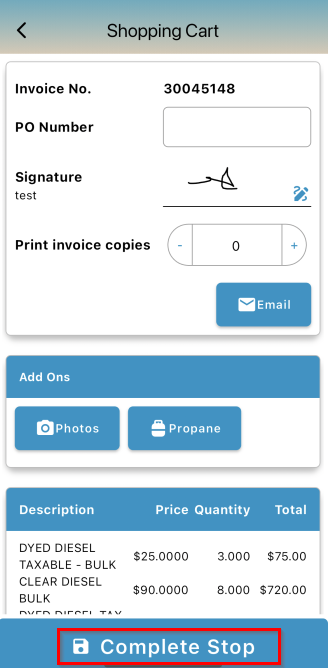
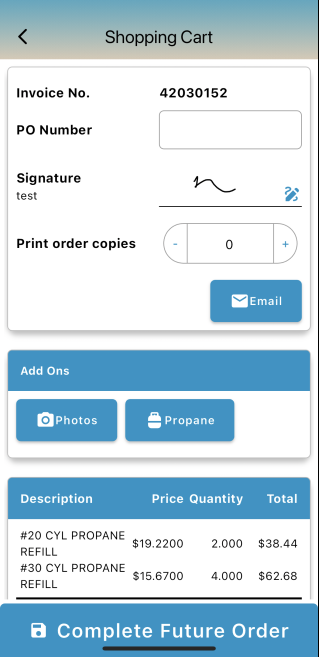
You will then be taken to the Shopping Cart screen, which serves as a preview of the invoice. Here, select Complete Stop to finalize the stop.
If you need to make any changes to the invoice after completing a stop, follow the steps outlined below:
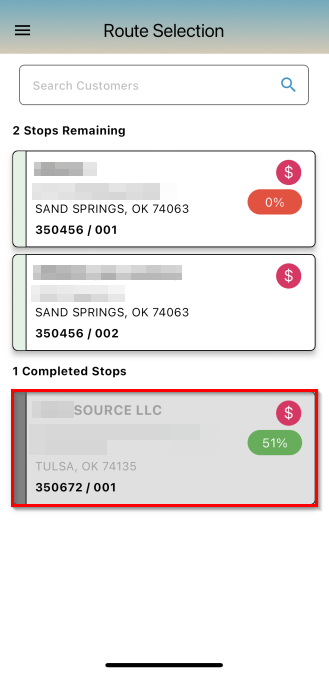
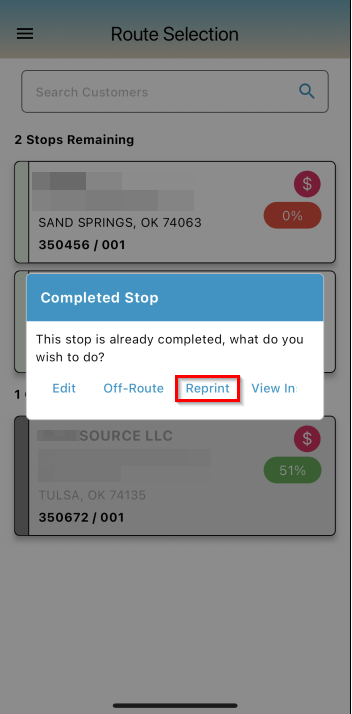
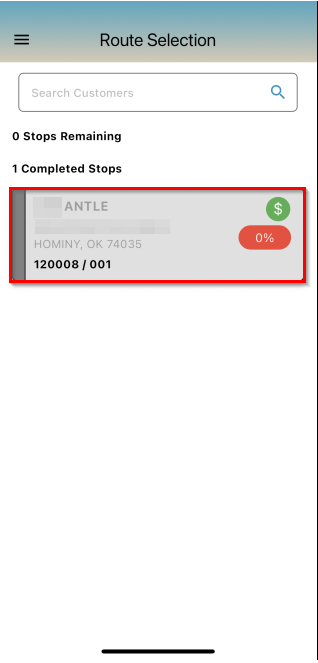
1. Navigate to Route Sales > Create Route Invoices to view both remaining and completed stops.
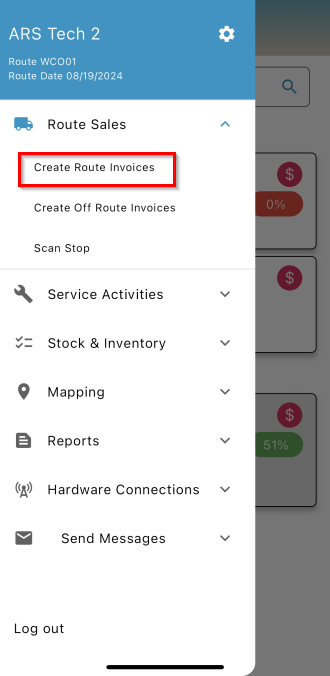
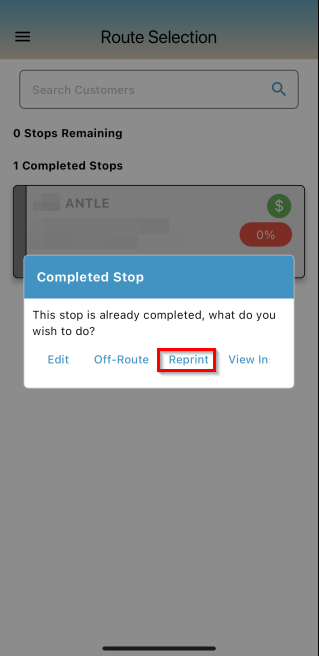
2. Select the completed stop where you want to edit the invoice.
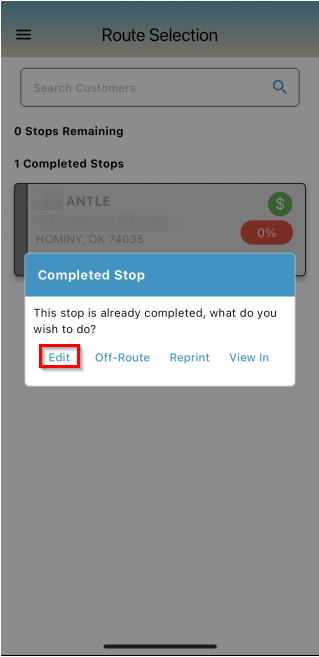
3. You will be presented with four options:
- Edit: Make an adjustment to the invoice or order.
- Off-Route: Service this stop again.
- Reprint: Reprint Invoice.
- View Inspection (Propane Industry): View saved propane inspection for this customer.
Select Edit to adjust the invoice.

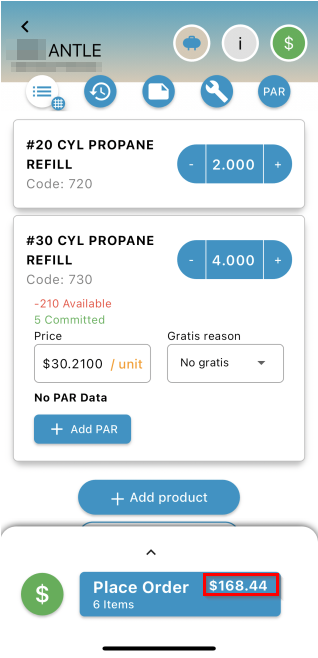
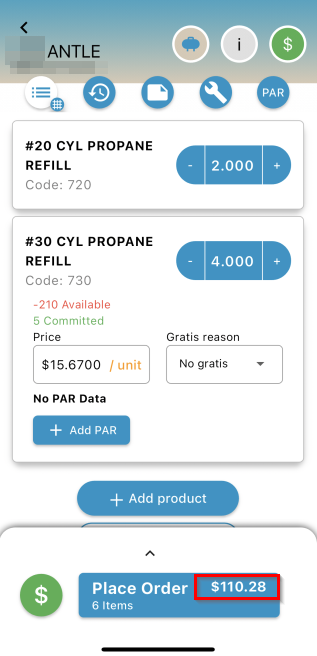
4. You can use the plus and minus buttons to modify product quantities or click on a product to change its price as usual. Once satisfied with the adjustments, select Checkout.
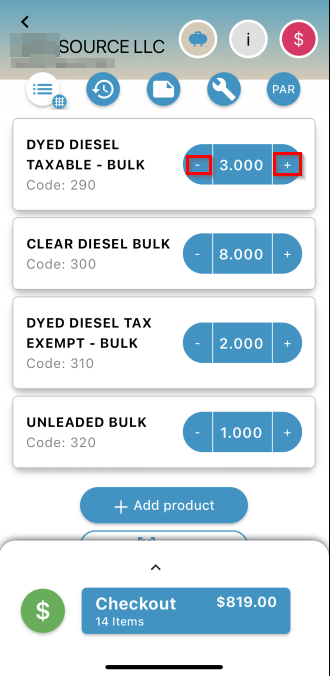
5. The changes will be reflected in the description, price, quantity, and total fields. When everything is correct, select Complete Stop.
6. To review the updated invoice, go to the Route Selection screen, choose the adjusted completed stop, and select Reprint.
Note: You can swipe to scroll over and see the full word of "View Inspection".
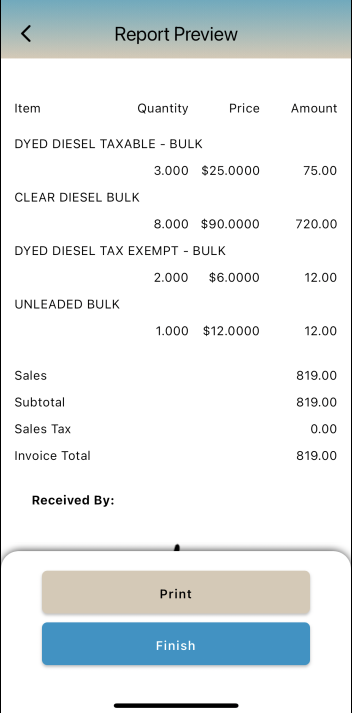
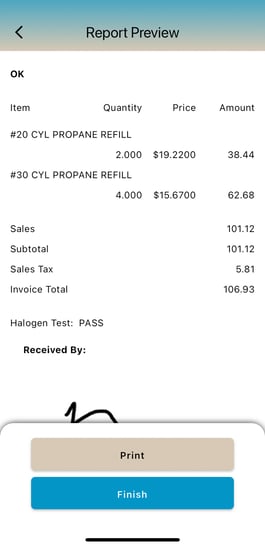
An example of the updated invoice after making changes post-stop is shown below.
In Future Sales, orders are used instead of invoices and should be editable in the same way.
Enabling Future Sales Payments in MOM
To enable future sales payments within MOM:
- Navigate to Lists > Routes > Handheld Class.
- Go to the Sales Rules tab in RMA.
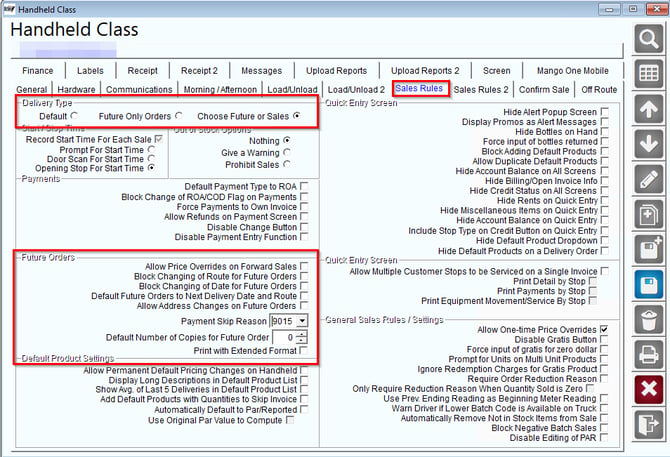
Fields for Delivery Type
- Default:
- Future Only Orders:
- Choose Future or Sales:
Creating and Editing Future Orders
In this example, we will be servicing off-route stops, but the steps also apply to "Create Route Invoices".
1. Navigate to Route Sales > Create Off Route Invoices.
 2. You will see a list of all stops. Select one. Depending on your RMA configuration, you will receive a notification asking if you want to Sell Product or Create a Future Order. Select Future Order as the order type.
 3. Service the stop as usual.
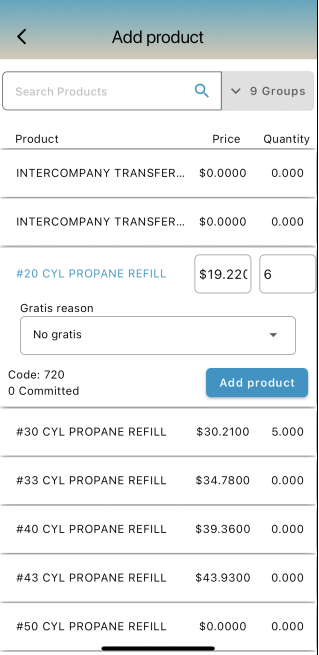
 4. Add products to the future order:
- Select a product.
- Edit the price, quantity, and gratis reason.
- Select Add Product.
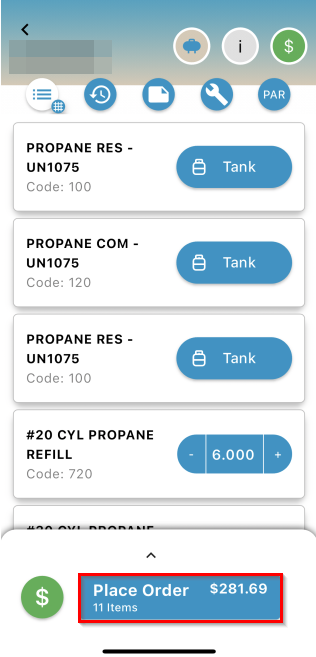
5. Review the added products; the total amount will update to reflect the changes. Once everything is correct, select Place Order.
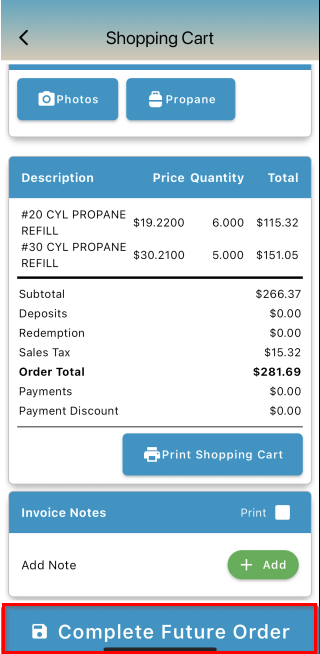
6. On the Shopping Cart screen, review the future order's description, price, quantity, and total. Select Complete Future Order.
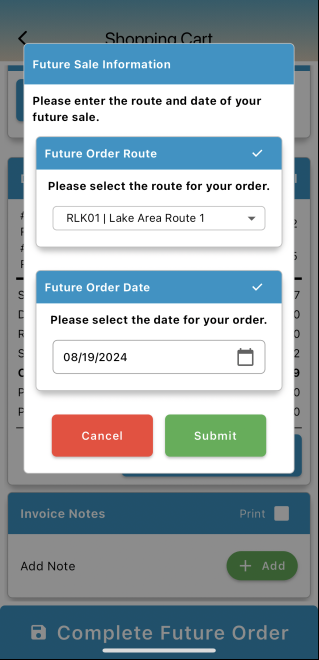
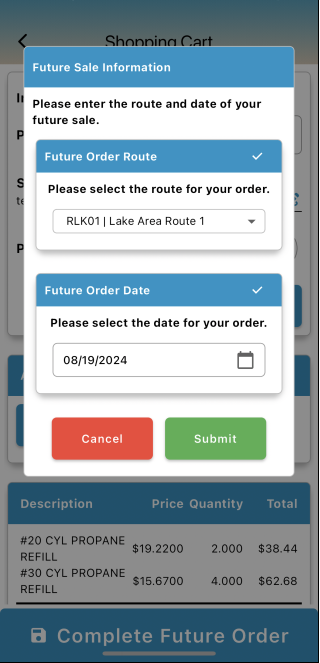
7. After completing the future order, select a route and date, then click Submit.
Editing a Completed Future Order
1. On the Route Selection screen, select Completed Stops.
2. If you need to make changes to the order after completing the stops, select Edit.
3. Choose the products you want to modify (quantity, price, gratis reason).
4. The price change will be reflected in the Place Order button at the bottom of the screen. Once your changes are complete, select Place Order.
5. After placing the order, review the changes on the Shopping Cart screen, then select Complete Future Order.
6. You can edit or keep the future order's route and date before selecting Submit.
Report Preview
1. To preview the report, navigate to the Route Selection screen and tap on the stop.

2. Select Reprint to view the report.
Here is an example of the Report Preview:
In RMA, go to Lists > Routes > Handheld Class and select the Morning/Afternoon tab. Next, enable the Attach Post Delivery Photos to PDF option. This feature allows you to automatically include any post-delivery photos in the PDF report, ensuring that all visual records are documented and easily accessible.

Summary
This article has provided an overview of how to enable and use the "Allow Editing of Orders and Invoices" feature on the Mango One Mobile handheld device. By following these steps, you can ensure that your field operations remain flexible, accurate, and efficient, with minimal disruption to your workflow.